Your Cart is Empty
Free Shipping on all orders over $50
Free Shipping on all orders over $50
How to Decorate with DIY Wall Art
September 24, 2021 3 min read
How to Decorate with DIY Wall Art
August is Artist Appreciation Month, which means it’s time to check out some beautiful art…and express your own creativity! I love a little DIY here and there to keep my home feeling unique and welcoming – and that includes some fun-filled wall art. Don’t worry; you don’t need to be a master artist to nail these projects. Even better? They’ll keep your space looking classy and chic.

Celebrate your creativity with these DIY wall art ideas:
Minimalist Art: Organic and Abstract
Don’t think you’re “artsy”? You can still make some amazing minimalist wall art. Get a couple of plain white posterboards and paints in a color palette that accents your space.
There are a few ways you can go with this type of minimalist art. For a more earthy feel, try out some funky, organic shapes and free-hand dark lines. For something more structured, you can opt for standard shapes that draw the eye. And if you want to keep things monochromatic, simply add white to one of your paint colors and paint shapes in the different shades you create. (For straight lines, use some painter’s tape for perfect edges every time!)
I recommend thin, simple white frames for this type of artwork.

The Sunshine Mirror
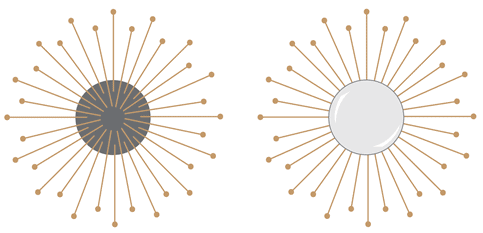
This mirror style is incredibly popular right now – and you can make one in an afternoon! Simply grab a circular mirror (about six to eight inches), wooden skewers, wooden beads, and your hot glue gun.
Flip the mirror, so the non-reflective side faces up. Next, glue your wooden skewers to the back with a hot glue gun. Attach some of them closer to the edge and some of them closer to the center of the circle, as that will allow for more variance in length. (I recommend a pattern of alternating long and short.) Then, use hot glue to attach a wooden bead to the end of each skewer. Allow to dry and hang to enjoy!
Depending on your surrounding décor, you can spray paint the skewers and the wooden beads gold, black, or your favorite accent color!

Teatime
Have a tea towel that’s just too pretty to destroy with regular kitchen use? Take it out of hiding and turn it into a mini tapestry to display its pattern!
Lay the towel down with the pattern facing the table. Then, cut two wooden dowels about 3 inches longer than the width of your tea towel. Center the dowels at the top and bottom of your tea towel so that about an inch and a half is protruding on either side. Now, you can secure the underside of the dowel to the tea towel with a dab of hot glue on either end to keep it in place.
Then, run a line of hot glue on the part of the dowel facing up, and fold the edges of the tea towel over.
On the top dowel, tie a piece of twine to either end to prepare the towel to hang like a picture frame. Cut off any excess string.

Design With Wine
We all love those art studios that allow us to bring along our favorite bottle of wine for a fun night of painting and drinks. So why not try painting with wine? Simply choose your favorite wine or two (I’d recommend red wines with rich, deep colors), and boil the wine in a saucepan to reduce the water content.
Once it’s cooled a bit, pour the wine into a small cup or paint pallet. Use your wine “paint” like a watercolor. Add more water to your brush for lighter colors, and keep things concentrated for darker colors.
I love the idea of painting simple cherry blossoms or koi fish with my favorite bottle of Cabernet! Whatever you create, it’ll be the perfect addition to your kitchen décor.
Using such a watery medium can be tricky! Remember not to be too hard on yourself as you create, and have fun!
Leave a comment
Comments will be approved before showing up.


